

this is fun sharing my little decorating "how-to" with you.
So the tree?
It started with the tall ceilings and white walls just begging for something to be done.
NOT wanting to paint
a) because of the high ceilings, and
b) because it's a rental
(this wall I painted is only about 5 feet wide with normal ceiling height)
I remembered my mom telling me once about a HGTV design show that did a bit on using fabric as wallpaper and I always wanted to try.
plus I saw a few pictures of vinyl wall hangings that I thought looked cool.
This project sort of combined the two.
Results: Super easy, super cheap and as you saw, super cute! (if I do say so myself).
Supplies: fabric, powdered fabric starch, paint brush, scissors and water.
oh and paper to make a pattern (I used a roll of craft paper from IKEA. Any roll of paper (like wrapping paper or cheap fabric would work)
For the fabric, I used what I already had in scraps (so resourceful).
The brown is 2 yards that I had in my collection for "some project" that never happened. I thought about using plain brown, but I like that the pattern makes it interesting, it ties in the blue that I already have in the room, and the flowers make it subtly feminine.
1st- I lightly drew what I wanted onto paper that I hung on the wall (I also drew on the wall itself)


2nd- then I cut out the paper tree and used it as the pattern for cutting out my fabric. This part may take a little more attention and planning your fabric has a pattern and you want the pattern to match up (stripes, plaids etc)

the leaves I cut free hand in an assortment of fabrics and sizes.
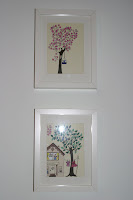
the good part about doing something like a tree is that it's very forgiving when it comes to precision. Here's an photo I took from my friends blog. to give you some inspiration (I think the giraffe is actually a vinyl sticker from pottery barn kids)

then the fun part.
3rd- stick the fabric to the wall using liquid fabric starch for glue!
more detailed rundown:
mix the powdered starch with water in a small bucket or a mixing bowl. I just eyeballed it and made a sort of runny goop (for lack of a better word). I don't think you can really mess up.
using the paint brush (it was just like a giant decoupage or paper mache project)
I first painted the fabric starch goop onto the wall, then placed the fabric onto the spot I just gooped, then put more goop on top of the fabric. I used my hands to smooth the fabric and squeeze out air bubbles and/or globs of starch trapped between the fabric and the wall.
The tree trunk was the trickiest part (although with another adult helping it wouldn't be so tricky. Asher and Ivy just weren't tall enough). I started at the bottom wetting with goop and smoothing about 2 feet at a time. I pinned the fabric up (instead of using another adult) as I worked because while it's wet, it can still peel off/ fall off very easily.
the leaves I just dropped right into the goop to soak it all up. As I pulled them out, I used my two fingers (pointer and middle) to slide off the excess goop and then I placed them on the wall where I wanted them. like I said- just like paper mache.
-sorry no pics of the "gluing" process. my hands were wet with fabric starch.
good clean fun (with a strong clean scent- thanks [or no thanks] to strong scented fabric starch)


once it dried, I went back in with the bowl of goop and paint brush to fix problem spots. I also used a wet rag to wipe excess starch off of the wall from places where it dripped (or where Ivy and Asher painted it on)
I hung a few things on the wall, changed the sheets and VOILA!!!


so easy. really.
sidenotes:
get it wet again and it peels right off without leaving and marks on the wall or damage to the fabric. (this is good because and bad. Good that the artwork can travel with me unlike painted walls or stickers. Bad if you have kids that might think it's fun to peel it off- thankfully my kids have left it alone)
I read some things that said spray starch can also be used (have you ever tried that? I wonder which is easier? stronger? cheaper?)
so many design possibilities. I'm excited to see the creations some of you come up with so send me pics or post them on your blog when you're done. I think a big patchwork wall would be fun (Britt?)
any questions?
or suggestions?

Thanks for posting this!!! I can't wait to try it!!!
ReplyDeleteso crafty T.C. and the results are awesome!
ReplyDeleteThat is so cute! Thanks for posting.
ReplyDeleteAnd I just thought only Pottery Barn or Land of Nod could provide such decor. That's awesome, Toria. I'm very impressed and excited to come up with my own wall project. Thanks for posting!
ReplyDeleteFYI - I have done this with the spray starch and it was awesome! Very quick and easy. Just saturate the fabric pretty well and slap it up there! Oh ya, and my walls were textured and it didn't make a difference. Wahoo!
ReplyDeleteI love it! I've never seen this before...fabric on the walls, who knew? I love the different colors and patterns you used for the leaves. Great job!
ReplyDeleteYou are AMAZING!! Come do my house. Very cute!!
ReplyDeleteDarcy
I seriously thought that was picture out of magazine. WHOA!!!
ReplyDeleteamazing. you always come up with the best ideas. and you're artistic nature ensures that your productions will always be a success. i love this. but i can't copy. . . i've already copied a name. . . darn!
ReplyDeleteYou never cease to amaze me. Do you do house calls? I need some inspiration!
ReplyDeletethanks for the compliments. I would LOVE to do house calls :). I would also love to see your creations- more trees, animals, I even think a patchwork wall would be cute. I may get jealous.
ReplyDeleteand just to keep it real- I was very intimidated to start this project- had it in my head for months before I did anything. it's intimidating, but turned out to be simple process.
I love this idea! I linked to it!
ReplyDeleteThis is awesome. Thanks for posting information on how to do it.
ReplyDeletelooking for liquid starch any suggestions?
ReplyDeletesorry Jan- I guess I should clarify. It's powdered starch that I mixed with water to make liquid. I found it in the laundry det. aisle (but I live in Dubai- so I can't speak for US stores). In the above comment my fried mentioned she used liquid spray starch and it worked. I'm pretty confident that is available and easy to find in grocery stores.
ReplyDeleteI would also recommend asking at a dry cleaner if you can buy some of their powdered starch or where to get it.
Excellent idea!
ReplyDeleteIn regards to the liquid starch, you can use corn starch mixed in cold water, and if you want to thicken it, you can heat it up on the stove. As soon as it starts to boil, it will start to thicken...then let it cool, and you are ready to go. You buy 'corn starch' in the cooking and baking aisle at the grocery store, it's also used to thicken gravy and so on.
The nice thing about the homemade fabric starch is that it is SUPER cheap, and absolutely non toxic. I read somewhere that laundry starch has a bit of formadihyde in it as a preservative, so the DIY starch is probably better for a kids room. Only mix up the amount you want to use in a day or so, because the homemade stuff will go bad.
There is a post where she uses Steam-a-SeamII iron on web and irons on fabric, cuts out pattern, then iron designs to wall. it kept her kids from peeling off the walls, and then it came off without any paint or damage to the walls. She said it was easier than liquid starch. I am going to try and make a tree in our teachers lounge if I can find some cute brown patterned fabric like you did.
ReplyDelete